Frequently asked questions
How to add a new item/product?
Congratulations on taking the first step to growing your product catalog! Adding a new product to your backend is quick and easy, and we're here to guide you every step of the way. Let's get going!
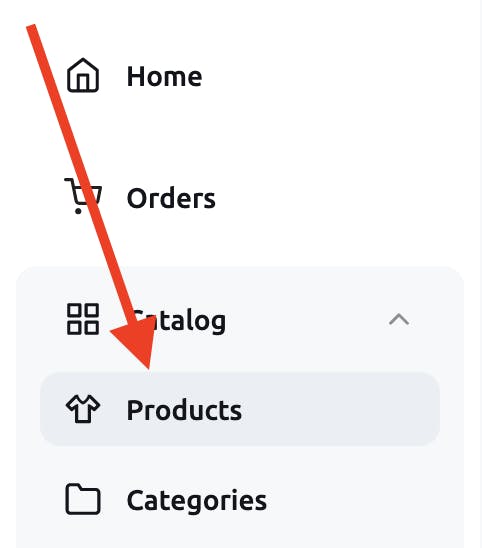
To start, go to the "Catalog" section in the left menu and click on the section called "Products." Here you can add, view, and manage all your products.
Adding a New Product: Once you're on the product list, click the "Add" button to access the product form. This form is divided into three tabs: "General," "Variants and Options," and "Additionally."
Filling in the Details: In the "General" tab, you'll enter all the important information about your product, such as the title, description, selling price, and quantity.
Showcasing Your Product: Upload one or more images to showcase your product and make it stand out. The first image you upload will be the main image, and you can sort the images by dragging them.
Assigning Categories and Collections: On the right side of the form, you'll be able to assign your product to one or more categories and collections. This will help your customers find your product and make sure it's displayed where you want it.
Saving and Publishing: Once you've entered all the information and uploaded your images, it's time to save your work. Click one of the save buttons to save your product and publish it for the world to see.
Revisiting Your Work: After saving, you can go back to the product list or continue editing the product. You can make changes anytime, so don't hesitate to update your product if needed.
And that's it! With these simple steps, you'll be able to add a new product to your backend in no time. Happy selling!
How to use a label or create a new one ?
With labels, you can make sure your customers never miss the special features of your products or store offers. These labels are displayed prominently on both the main page and product page, right next to the product image.
Choose the Label for Your Product: Go to the product form you want to label and check the box next to the label of your choice.
Create a Custom Label: If you don't see the label that suits your needs, no problem! Just click the "Create new label" button and give it a custom name, choose its color and add an icon.
Set Automatic Label Removal: You can set the automatic removal of labels after a specified number of days. In the label form, simply check the "Automatically remove from products" box and enter the number of days.
Remove Label from a Single Product: If you need to remove a label from a product, go to "Products", select the product and uncheck the label.
Remove Label from All Products: To remove a label from all products, go to "Labels" in the "Catalog" section of the left menu. Select the label and hit the "Remove from all products" button.
Easy as pie! Whether you're creating a new label or removing an old one, you're just a few clicks away from giving your products the attention they deserve.
How do I create and enter custom characteristics?
We're here to help you make the most out of your products and give them the attention they deserve. Adding characteristics to your products can be done easily through the "Commodity group" menu or through the product card. Follow these simple steps to get started:
Access the Product Form: In the product form, you can find the "Variants and properties" tab. Before you start adding characteristics, make sure that the correct commodity group is selected. If you sell only one type of product, you can use the default commodity group. To create a new commodity group, simply click on the select button and choose the "+ Create a new commodity group" option.
Adding the Characteristic: Once the commodity group is selected, click on the "Add characteristic" link to start adding your desired characteristics. In the window that appears, give your characteristic a name, and select the type that suits your needs.
Characteristic Types: There are five different types of characteristics available:
- Text: A small description in one line. For example, product composition.
- Multiline text (TextArea): Allows line breaks. For example, additional product description.
- Checkbox: Multiple choice of certain properties. For example, product size or color.
- Switch (Radio): Single selection of a certain property. For example, product function availability.
- Drop-down list (Select): Single selection of a certain property. For example, product manufacturing year.
Adding Characteristic Values: For the types "Checkbox", "Switch (Radio)", and "Drop-down list (Select)", you'll need to add characteristic values. Simply enter the data in the "Cases" field, and as you start typing, additional input fields will appear so you can enter as many values as you need.
Filling in the Characteristics: For fields with the type "Text" and "Multiline text (TextArea)", simply enter data into the corresponding fields. For fields with the type "Checkbox", "Switch (Radio)", or "Drop-down list (Select)", select values from the created list.
Editing Characteristics: If you need to edit or delete a characteristic, simply click on the "Edit" or "Delete" button next to the characteristic name. You can change the name, type, and values of the characteristic as needed.
With these easy steps, you'll be able to add as many characteristics as you need to give your products the attention they deserve.
How to create variants?
To add product variants, go to the "Variants and Properties" tab and click on the "Create Variants" button. The window that opens will show the characteristics of the product group you've already created.
You have the option to base the variants on these existing characteristics, or add new ones.
Adding Characteristics: Simply enter the name and value of the characteristic in the designated fields.
Adding Values: Click on the "Add Value" button to specify the options for the characteristic.
Adding More Attributes: If you need additional characteristics, hit the "Add Attribute" button.
Previewing Options: The bottom of the window will display the options that will be created based on the intersection of the characteristics you've chosen.
Finalizing Options: You have the ability to uncheck any options that you don't want to create, then click on the "Create Variants" button to finalize the process.
And that's it! The variants for your product are now created. All that's left to do is specify the prices and stock balances for each variant so they can be made available for sale on your website.
How to edit variants?
To edit variants,
Go to the Variants and Properties Tab.
Select the Edit Option: Click on the “Edit” button located next to the desired variant or on the name of the characteristic used to create the option.
Update Variant Information: You can change the following information for a variant:
- Vendor code
- Selling price
- Old price
- Purchase price
- Remains
- Weight and dimensions
Note: If weight or dimensions are specified for the variant, they will override the product's weight and dimensions. For example, if you sell shampoo in two different sizes, you'll need to set the weight for each size. If the variants have the same weight, like T-shirts in different colors, you can specify the weight for the product rather than the variant.
Save Changes: Click the “Save” button after making your changes.
To edit variants from the table,
Locate the Variant Line: Click on the intersection of the variant line and the column you wish to change.
Update Prices: If you wish to change the prices, click on the intersection of the option and the “Price” column. Two fields will appear for editing the sale price and old price. Enter the desired values and press “Enter” to save the changes.
Update Remains: If you wish to change the remains, click on the intersection of the variant and the “Remains” column. Fields will appear to enter the balances for each warehouse. Enter the desired values and press “Enter” to save the changes. How to set mass prices can be found at the here.
Note: You can also set mass prices and stocks, which can be found here.
How to fill title and meta-description for a product?
In the Boundless Commerce system, access the product card and click on the "Edit" button next to "Preview in search results."
Use the Template or Make Changes: You can choose to use the current template or customize the Title and Meta-description fields. The default text will appear in gray and can be overridden.
Update the Fields: Input your desired text in the Title and Meta-description fields, and watch as your changes are reflected in the preview above.
Priority over Template: Your product card data takes precedence over the template, so the custom text you enter will be displayed in the search results.
Enhance Your Product's Presence: With custom Titles and Meta-descriptions, your products will stand out in search results and attract more potential customers.
How to establish a link between products?
In the Boundless Commerce system, go to the product form and select the "Additional" tab.
Adding Related or Similar Products: Click on the "Add" button (plus icon) in the corresponding section to bring up a product selection window.
Filtering and Searching for Products: On the left, use the category hierarchy or search bar to find the products you want to match.
Selecting Products: Simply click on a product to select it. The selected product will appear in the "Selected Products" column.
Cross-Sell Relationships: Check the "Add relations between all selected products" box to ensure all selected products are displayed in cross-sell blocks with each other.
Finalizing Your Selections: Once you have chosen all the necessary products, click the "Add" button to have them added to the section and displayed on the site.
Boost Your Sales: With the help of related and similar products, you can increase customer engagement and drive more sales.
How to bulk link between products ?
In the Boundless Commerce system, go to the list of products and select the ones you want to set Cross-sell for.
Access the Cross-sell Menu: From the bottom menu, click on the "Cross-sell" button and choose between "Add related products" or "Add similar products".
Define Your Cross-sell Type: Select the type of Cross-sell you want to add and the window to specify the products will appear.
Selecting Products: In the window, choose the products you want to add to the selected section.
Streamline Your Work: With the ability to set similar and related products in bulk, you can save time and optimize your workflow.
Boost Your Sales: The added related and similar products will increase customer engagement and drive more sales.
You’ll get more information about adding products here.
How to do cross-selling?
Cross-selling, simply put, is a marketing technique that encourages customers to purchase complementary or related products. For instance, when selling a white T-shirt, similar products could be T-shirts of different styles or colors, while related products could be shorts, pants, or sweatshirts.
The beauty of cross-selling lies in its mutual benefits for both the buyer and the seller. For the buyer, it saves time and effort in searching for related items, and for the seller, it increases sales without incurring extra costs.
In Boundless Store, cross-selling can be achieved through two matches:
- Buy with this product
- Similar products
By default, the "Buy with this product" block is displayed in the product card below the main information, and its name can be customized. On the other hand, the "Similar products" block is not displayed by default.
Get more out of your sales strategy with the power of cross-selling in Boundless Commerce.
How to clean up the database?
To clear out the demo data, go to the "Settings" menu and select "Clean database."
For confirming the clean-up, In the pop-up window, type in the word "clean"
Caution: This will erase all data in the database, including products, categories, orders, users, etc.
Finally, hit the "Clean database" button to proceed with the cleaning process. DONE!